Getting Started with Victory Native
These docs are for the legacy versions of Victory Native. Victory Native XL is our rewrite of Victory Native designed specifically for React Native. Please [see here for more information] (https://commerce.nearform.com/open-source/victory-native/). If you would like to continue to use this version of Victory with React Native, follow the legacy guide below.
In this guide, we’ll show you how to get started with Victory Native and the React Native SVG dependency running in your React Native app for iOS and Android.
1. Adding Victory Native to your React Native app
Visit the guide on getting started with React Native if you’re just getting started with React Native.
Victory Native is compatible with React Native 0.50 or higher.
To add Victory Native to your React Native app install victory-native.
$ yarn add victory-native@legacy # or npm install --save victory-native@legacy
2. Add React Native SVG to your app
If you are building a project with native code, you will need to link the native dependencies of React Native SVG to the iOS and Android projects.
This step is not required if you are using Expo (SDK 23.0.0 or higher) as it is already included.
React Native 0.60 or newer:
$ yarn add react-native-svg  # or npm install --save react-native-svg
$ cd ios
$ pod install
React Native below 0.60:
$ react-native install react-native-svg
note: If you run the iOS app and see a linker error for -lRNSVG-tvOS you will need to remove libRNSVG-tvOS.a from the “Link Binary with Libraries” section within your iOS app’s target’s properties.
3. Using Victory Native in your React Native app
Victory Native behaves and functions the same way for React Native as it does for the web. Just import components from victory-native to get started. To learn more about how to use Victory visit the Getting Started Guide.
The example below shows how Victory Native easily integrates within your React Native app.
import React from "react";
import { StyleSheet, View } from "react-native";
import { VictoryBar, VictoryChart, VictoryTheme } from "victory-native";

const data = [
  { quarter: 1, earnings: 13000 },
  { quarter: 2, earnings: 16500 },
  { quarter: 3, earnings: 14250 },
  { quarter: 4, earnings: 19000 }
];

export default class App extends React.Component {
  render() {
    return (
      <View style={styles.container}>
        <VictoryChart width={350} theme={VictoryTheme.material}>
          <VictoryBar data={data} x="quarter" y="earnings" />
        </VictoryChart>
      </View>
    );
  }
}

const styles = StyleSheet.create({
  container: {
    flex: 1,
    justifyContent: "center",
    alignItems: "center",
    backgroundColor: "#f5fcff"
  }
});
4. Ignoring require cycles
As of victory@36.4.0, React Native apps (on both iOS and Android) will warn about require cycles.
These warnings will not affect the functionality of victory-native or your app, and can be safely disabled.
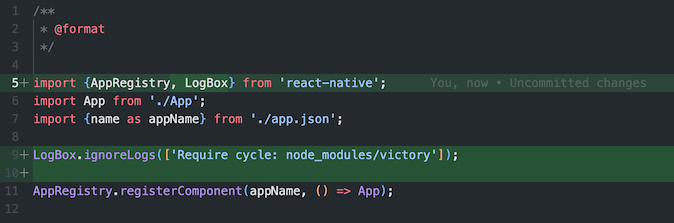
To disable the warnings, modify your app's entry point (usually index.js) to include
LogBox.ignoreLogs([
  "Require cycle: node_modules/victory",
]);
as shown below
5. Testing Components that use Victory Native
You can test your components that render Victory Native using Jest and React Test Renderer which is included out–of–the box with React Native. The jest configuration section in package.json will need to be modified to ensure dependencies are transformed otherwise you will see an error when tests are run.
"jest": {
  "preset": "react-native",
  "transformIgnorePatterns": [
    "node_modules/(?!victory|react-native-svg|react-native)"
  ],
  "transform": {
    "^.+\\.jsx?$": "babel-jest"
  }
}
To test the above App component you can simply do:
import "react-native";
import React from "react";
import App from "../App.js";
import renderer from "react-test-renderer";

it("renders correctly", () => {
  const tree = renderer.create(<App />);
  expect(tree).toMatchSnapshot();
});
note: renderer must be imported after react-native for tests to work.