
At Formidable, we've converted many of our OSS projects to TypeScript, including Spectacle and react-swipeable, and have helped many of our clients adopt TypeScript as well.
Converting a project to TypeScript is an investment worth making. Here’s what you need to know to make the process go smoothly and quickly.
The Three-Phase Approach
Our best strategy for adopting TypeScript is to break it down into three phases: build, migrate, and improve.
- In the build phase, we focus only on the configuration required to build TypeScript files.
- In the migrate phase, we focus on converting JS files to TS, while trying to keep the code as intact as possible.
- In the improve phase, we focus on making code improvements: improving types, adding stricter rules, and so on.
This phased approach reduces the complexity of each change and reduces conflicts along the way. If your project is large or has multiple contributors, it's especially important to merge after each phase!
Before we start: why bother?
Before we start, we need to identify our motivation for adding TypeScript to our project. Our reasons for migrating an existing project to TypeScript might not be the same as the reasons for choosing TypeScript for a new project. "Preventing bugs" and "increasing velocity" aren't as relevant when the project already exists!
Let’s focus on the goals that make the most sense when converting a project:
- Strengthen our existing code Strong types are an important part of the “Testing Trophy”, and adding TypeScript types to your code is like adding unit tests. They add strength and stability to the codebase and give you confidence in making changes.
- Make our APIs easier to consume Publishing our types with our libraries makes them far easier to consume, for JS and TS consumers alike.
- Find bugs As you convert files to TypeScript, it's likely you'll start spotting type issues that could be causing bugs.
- Improve future development TypeScript vastly improves the IDE experience: auto-completion, code navigation, detecting type errors, etc.
Phase 1: Build
The goal of this first phase is to get a single, simple .ts file to compile!
Create your tsconfig.json file
The best way to initialize your project for TypeScript is to run these two commands:
npm install --save-dev typescript
npx tsc --init
The first command installs TypeScript and the tsc compiler. The second command generates a fully-annotated tsconfig.json file for you. The “fully annotated” file is especially useful because it includes detailed explanations for EVERY option! The generated file is also going to be more up-to-date than most examples you find on the internet.
Relax your TS config
Typically, TypeScript's strict mode is our friend. It ensures our code is very-strongly-typed and forces a lot of great patterns.
However, our initial goal of conversion is to get our JavaScript files to compile as TypeScript. To do this, we need to really relax our TS config!
In your tsconfig.json file, change "strict" to false. Look through all the other “type checking” options, and turn them off for now. We’ll turn these options back on eventually in phase three but for now the more relaxed, the better!
Apart from changing “strict”, the rest of the generated options are good. I especially want to mention "esModuleInterop", which should be set to true . This allows import foo from 'foo'; (or const foo = require('foo');) to continue working.
Configure your build tool
Configuring the various build tools is a bit out of scope for this article, but I wanted to give you an idea of what this will take.
Some build tools both compile and type-check at the same time. But this approach is slow and cumbersome. It’s much faster to split these jobs into separate tasks.
You should run tsc --noEmit on your project to perform all the type-checking. I highly recommend doing this in a CI job. And typically, your code editor will highlight your TypeScript errors as you develop, so you probably don’t need to run this manually often.
All that’s left is configuring your build tool to “strip out” the TypeScript code!
- webpack - https://webpack.js.org/guides/typescript/
Be sure to disable type-checking with
transpileOnly: true(as mentioned above). - babel - https://babeljs.io/docs/en/babel-preset-typescript
- Rollup.js - https://github.com/rollup/plugins/tree/master/packages/typescript
- esbuild, parcel, snowpack, storybook - These tools automatically compile TypeScript out of the box!
Here’s a list of other tools you might be using, which will need to be configured to load TypeScript too:
- eslint - https://typescript-eslint.io/docs/linting/
- jest - https://kulshekhar.github.io/ts-jest/docs/getting-started/presets
- karma - https://www.npmjs.com/package/karma-typescript
- Others - many tools, including Node itself, accept a
--requireparameter, which can be used withts-node/registerto compile TypeScript. Eg.node --require ts-node/register ./my-script.ts. This can be used for many tools that otherwise don’t support TypeScript.
Compile your first TypeScript file
The goal of this whole phase is to get something to compile ... just one simple little file is all we need for now! You can find a simple utility in your codebase and convert it, or even just create a hello-typescript.ts and get it to compile.
Once we have this working ... it’s time to merge, and start phase two!
Phase 2: Migrate
In this phase, we will focus on migrating our JavaScript code into the TypeScript ecosystem. Our goal is to make the minimum changes to our code and get a working build.
Automatic Migration Tools
There are tools that can help convert your .js files to .ts and will save a ton of time. These tools give you a great head start, but can only go so far; they use a lot of any and // @ts-ignore (which is OK for this phase).
- ts-migrate - Migrates
.jsfiles to.ts, and adds some TypeScript annotations along the way. Docs: https://github.com/airbnb/ts-migrate/tree/master/packages/ts-migrate - ratchet - Converts from
React.PropTypesto TypeScript types
Use any when blocked
Remember, the goal of converting to TypeScript is to progressively improve code quality. We don’t have to achieve "100% type-coverage" right away.
So when there's something that's difficult to type correctly, feel free to use any. This just tells TypeScript "don't worry, this works" and will help speed along the conversion.
After all, your entire JS library was typed as any to start with ... there's no harm in leaving this improvement for a later time.
Use // @ts-ignore sparingly!
The problem with // @ts-ignore is that the entire line will be ignored. It can mask multiple errors, even if it was originally used to mask a specific error.
It's better to use a cast in these situations so that you bypass only a single error. For example, use as any or better yet as unknown as SomeType.
However, on occasion, there’s a problem that’s too difficult to correctly type, or an import statement that just can’t be appeased, so that’s an OK time for ignoring the line.
You can also consider using // @ts-expect-error, which is almost identical — except if you ever do fix the underlying error, then this will remind you to remove the comment!
Minimize Git diffs and conflicts
If your project has multiple contributors or multiple branches, then this one is important!
When you rename your files from .js to .ts, and more than 50% of the file has differences*, then Git will treat it as a delete and create (instead of a rename).
This causes a TON of headaches! Difficult merge conflicts. Terrible PR diffs. Here’s a small example of a file that crossed the 50% threshold:
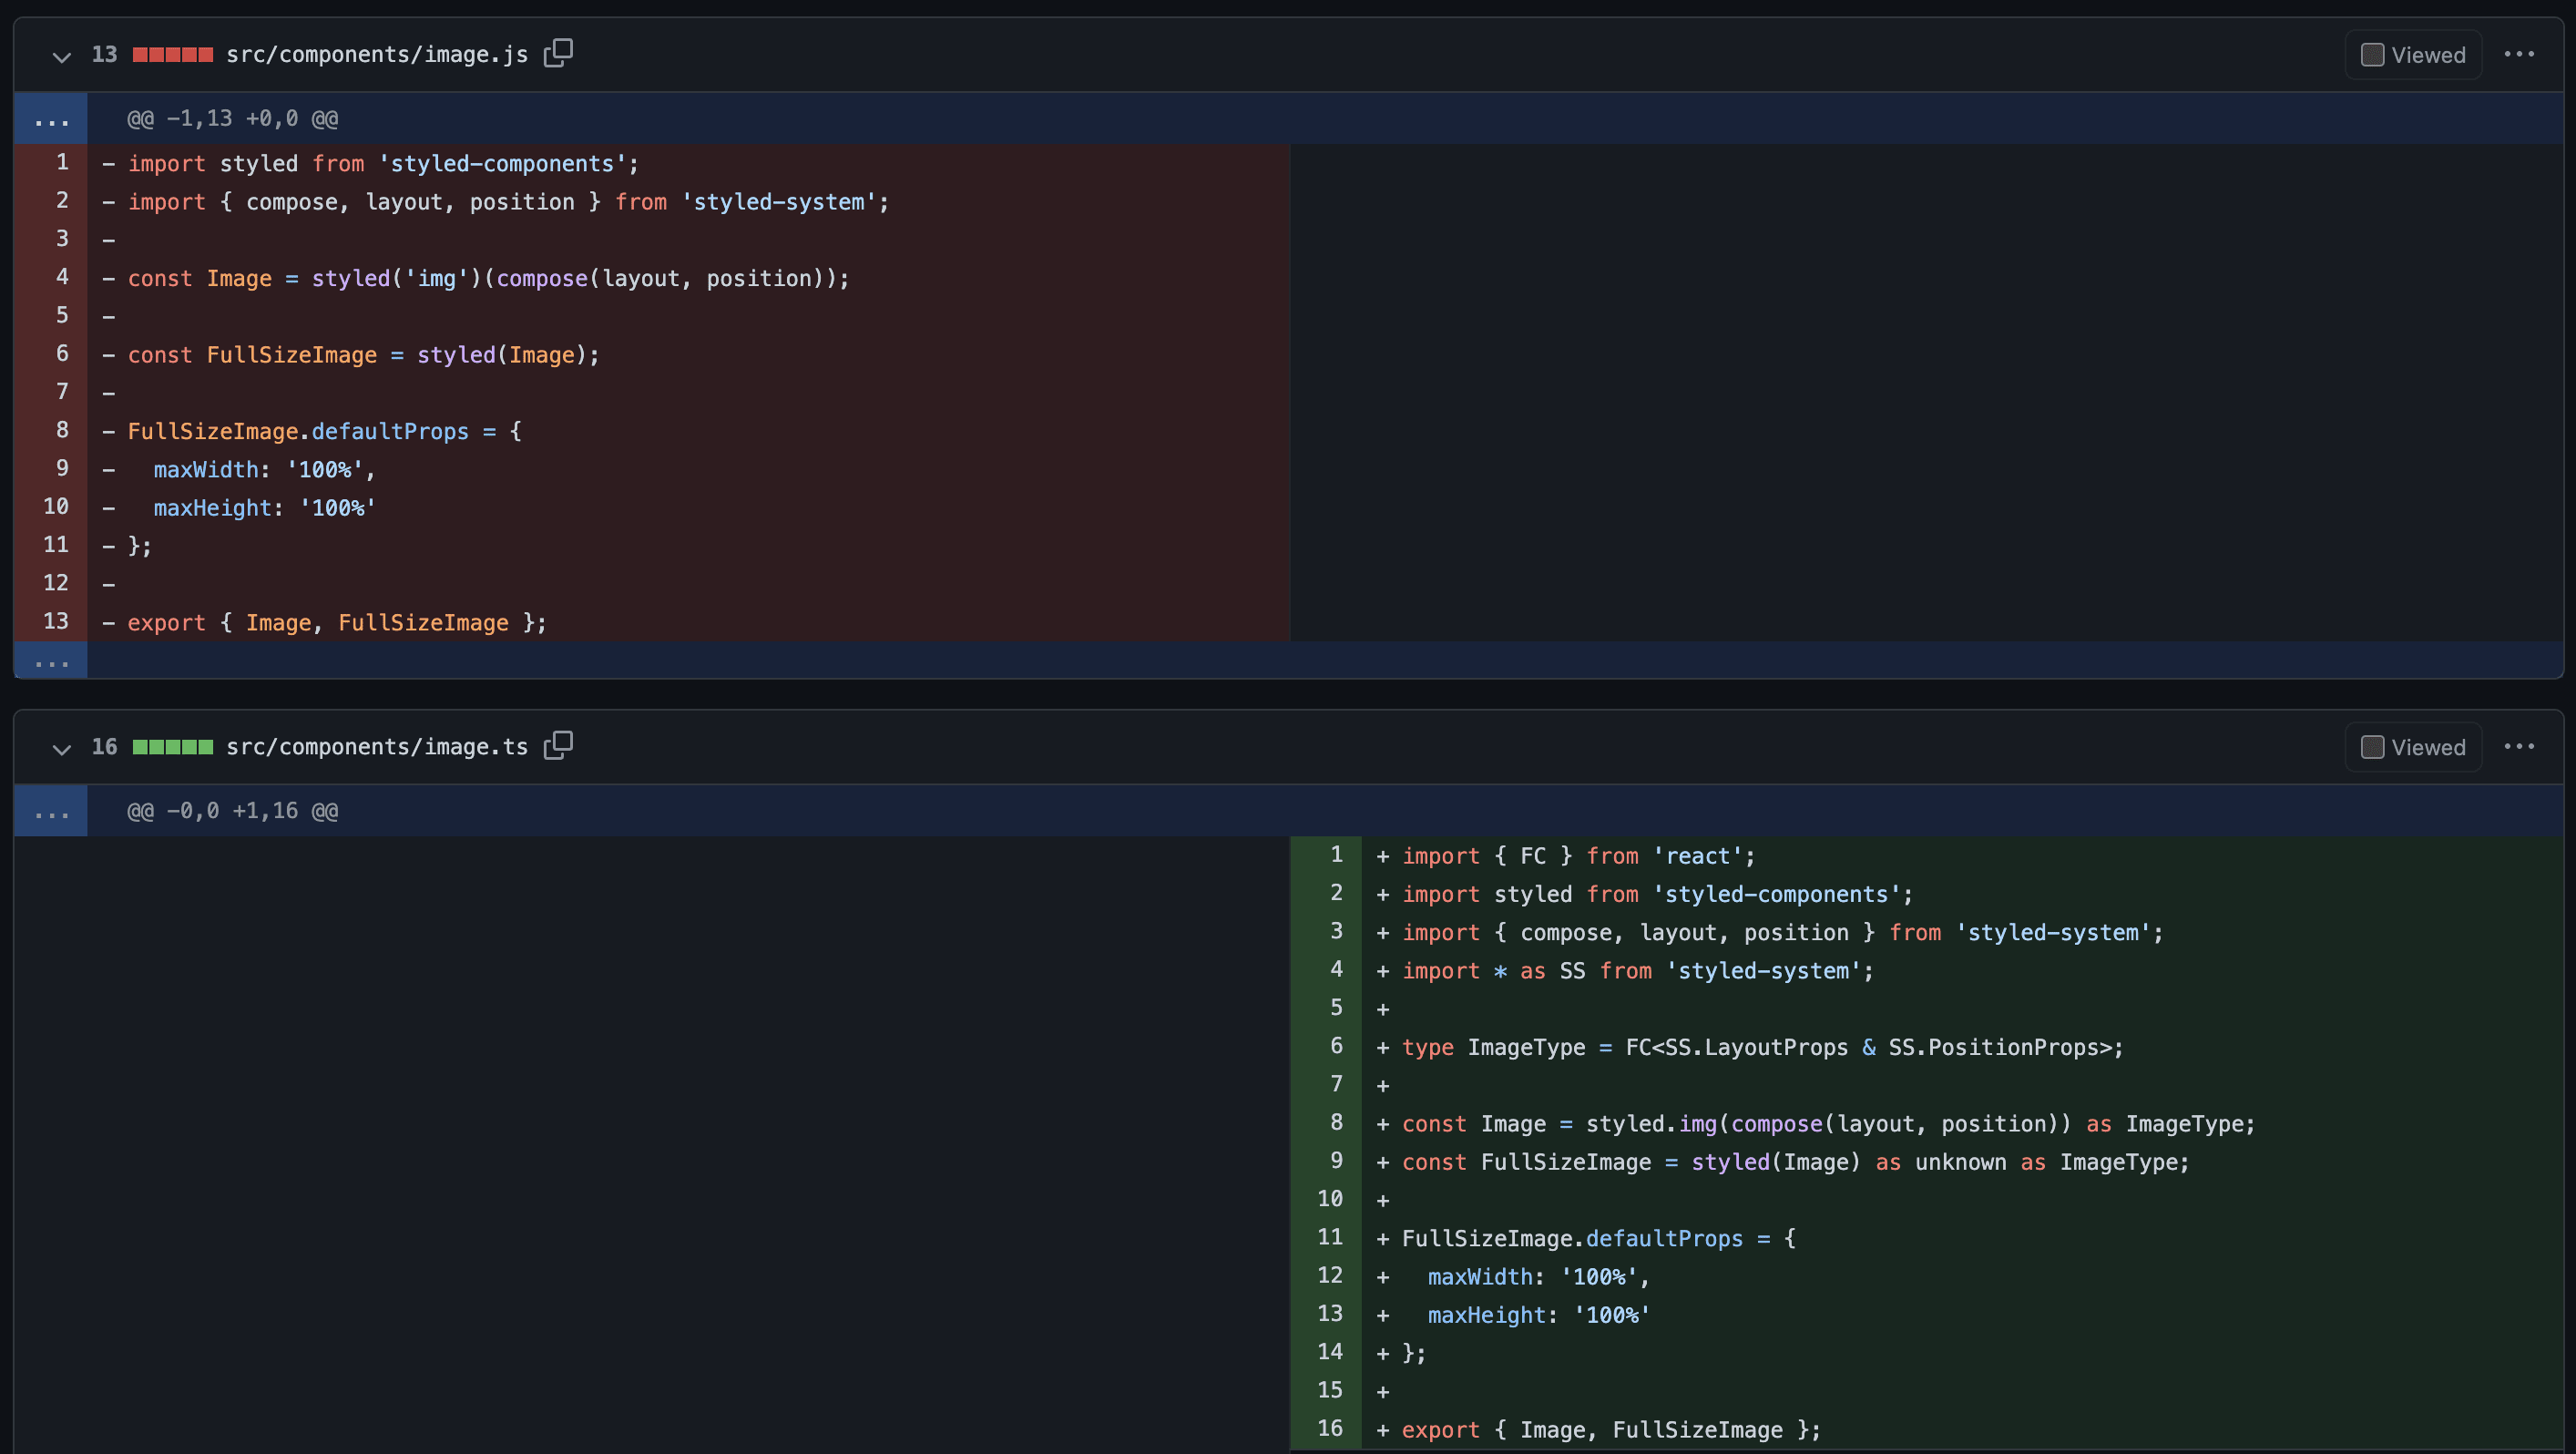
Source: the Spectacle TS conversion
To minimize this problem, you have to try to stay under that 50% threshold*. Rename the file; don't reformat your code, don't indent lines, don't refactor, if possible! Simply add the types that are necessary, and commit the minimum. It can be quite difficult, especially with smaller files, to stay under that 50% threshold.
* Note: How does Git measure a "50% difference"? This is measured by lines changed. So if you simply indented 20 lines of code, and the file was only 40 lines long, you'd hit that threshold! The diff would show a delete and create instead of a rename. The diff is cumulative, too ... so if you change too much, you can actually add commits to reduce the diff.
Hold off on fixing bugs
As you convert files, it's possible that you'll find issues that you want to fix. Things like "this should be a string" or "this function is missing an argument" will pop up, and you'll probably want to fix it!
Before you fix any potential bugs, consider:
- Is fixing this a "scope creep"?
- How much extra work will this be? (eg. adding unit tests, documentation?)
- Could fixing this be risky?
You might want to consider dropping in a // TODO comment for now and fixing this SEPARATELY from the TS conversion. That way, the TS conversion won't be hindered by scope creep or regressions.
As an example, when converting Spectacle, I saw a return; which I assumed could be improved to return null; but sure enough, it ended up causing a regression!
Phase 3: Improve
Once all your files have been migrated to TypeScript, you can start with the fun stuff: improving your “type-coverage”.
This phase is where you should add stronger types, install type definitions for dependencies, enable TypeScript's strict options, and remove any's.
Most of these improvements can be made progressively, like removing an any whenever you see it. Some improvements need to be fixed project-wide, like when you enable a strict check.
It’s really up to you and your team to decide how aggressively you want to increase your type-coverage.
Install third-party types for your dependencies
In an ideal world, all your dependencies will have strong type definitions bundled! But unfortunately, many will not have types bundled, and you'll have to add them with one of these three methods:
- Install a
@typespackage for the dependency. For example, if you have a dependency on"react": "^18", you should runnpm install --save-dev @types/react@18. If not bundled with types, the most popular libraries will have a corresponding@typespackage. - Upgrade the package, because newer packages might have bundled types. But be warned: upgrading packages can cause regressions, especially if upgrading to a major version that now includes types.
- If the types are still not available, you'll have to manually create your own types. Typically, these go in a
./types/{module-name}.d.tsfile. Typing an external library can be very challenging; useanyif you get blocked.
Enable Strict Mode once you’re ready
Once you’ve migrated everything to TypeScript, you should try to enable some strict checks. Don’t go straight for "strict": true and expect your build to succeed! It’s best to enable strict checks one-by-one, and see if your code still compiles.
The more strict checks you can enable, the better! Some checks might not require any code changes at all! Some might be a disaster, causing hundreds of build issues.
Here’s what to do when you enable a rule that uncovers a lot of errors:
-
Disable the rule again, and slowly back away (no judgement here!)
-
Fix the errors (which could be very difficult and time-consuming)
-
Add
// @ts-ignoreor// @ts-expect-errorcomments to the errors.- The advantage of this approach: all new development will be subject to the strict rules, and all the old code will be marked for improvement.
- The
ts-migratetool (mentioned above) has areignorefeature that can insert these comments for you, too!
These are the two most useful strict options that are worth enabling (but will likely require fixes):
- Enable
strictNulls, and check your code for null-safety. You might need to add the not-null assertion (!) some places, which is similar to addingany... it doesn't change the code, it just bypasses the check. It's better for these explicit!assertions to appear in your code, rather than being ignored by the compiler; it makes it easier to spot potential problems. - Enable
noImplicitAny, and add explicit types where missing (even if justanyfor now). Again, this makes it easier to spot errors in your code, and thoseany's act like TODO’s.
Add @typescript-eslint
This goes hand-in-hand with enabling strict-mode checks ... linting your TypeScript code adds to the strength and quality of your codebase! It helps you avoid bad TypeScript patterns, and can fix many of them for you too.
Approach this in a similar fashion to adding TypeScript — be relaxed at first, and progressively enable more linting rules as you fix the problems.
- Start off with the recommended rules: Linting your TypeScript Codebase
- Be sure to read the docs about Linting with Type Information — these rules are incredibly useful! But since they run slower and require extra config, they’re not enabled by default.
Remove anys from your code
So far, I've encouraged using any throughout your codebase; it's a great way to migrate JavaScript into TypeScript land.
But those anys are basically just TODOs, and should be improved to real types when possible. You might want to make these improvements progressively, any time you touch a file. But you can also go on an any hunt!
Similarly, keep your eye out for // @ts-ignore and // @ts-expect-error and remove those when you can too.
Publish libraries with at least a minor bump
This only applies to libraries, not applications, but once you’re happy with the TypeScript conversion, it’s time to publish!
If your API has changed (even just by adding stricter types), you should publish with a major bump.
But if you've minimized the number of changes to your project, and your API hasn't changed, it's reasonable to publish with a minor bump.