
Three weeks ago, we at Formidable unveiled an exciting open source project we've been working on as part of our OSS Fellowship Program – renature. renature is a physics-based animation library for React focused on building delightful UI animations using natural world forces like gravity, friction, and fluid resistance.
Since the initial announcement of the project we've made a lot of progress, adding full support for the above three forces and beginning to scaffold out an API for pausing, reversing, and replaying animations while preserving the simplicity of our tiny hooks API.
In this post, we're going to dig into some of the nitty gritty of how we're building renature by focusing in on one of our hooks — useFriction. We'll discuss the underlying physics that powers this animation, how it integrates with requestAnimationFrame, and how we account for issues with precision. We'll also discuss some of the caveats and drawbacks of our approach as well, highlighting some areas where we plan to improve in the near future. By the end of this post you should have a good sense of how renature works and the types of animations it can unlock for you.
Understanding Friction
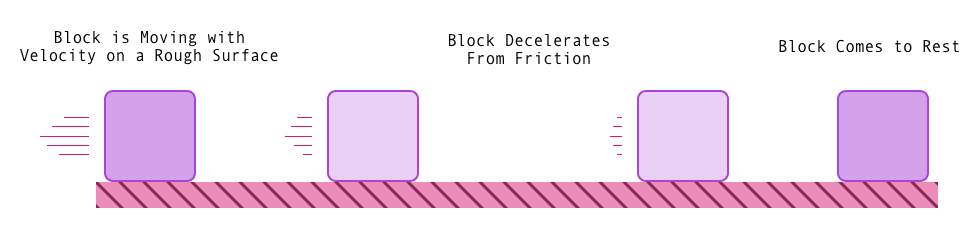
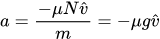
To understand how the useFriction hook will animate an element, it's useful to first understand the actual physics it's based off of — the force of friction! Friction is a familiar force for a lot of us— it's what causes your bike to slow down when you engage the brakes, or what gives your hands that nice warm feeling when you rub them together. Friction is a dissipative force; it will decelerate an object over time. The force of friction is derived using the following equation:

If it's been awhile since your high school or college physics (as it had for me), let's simplify the equation above. The µ ("mu") above represents the coefficient of friction, essentially a representation of the roughness of the surface our moving object is traveling over. The N represents the normal force, a metric describing how much force the surface is exerting upwards on the moving object. Heavier objects (or rather, objects with a greater mass) will experience a stronger normal force than lighter objects. The final v character represents the unit vector of the moving object's velocity. This isn't super important to understand just yet. The key concept to identify here is that, combined with the leading negative sign, this equation expresses that the force of friction acts in the opposite direction of the moving object's velocity. This is why moving objects slow down over time when exposed to the force of friction.
If we look at the API for our useFriction hook, we'll see that the parameters that get passed to our hook line up with this equation quite nicely.
const [props] = useFriction<HTMLDivElement>({
  from: {
    transform: 'scale(1) rotate(0deg)',
  },
  to: {
    transform: 'scale(1.5) rotate(720deg)',
  },
  config: {
    mu: 0.5, // Oh look! The coefficient of friction, µ.
    mass: 300, // The mass of our moving object. We can use this to calculate the normal force.
    initialVelocity: 10, // The initial velocity of our sliding object.
  },
});
Simulating Real World Physics through Code
So we have a physics equation and some parameters that can help us to model the force of friction. But how can we translate from an equation to a DOM element moving in the browser? In renature, we start by coding a simulation of an object moving on a rough surface.
If you've heard of Newton's laws, you've probably heard this expression before — force equals mass times acceleration.

And just above, we derived the force of friction, so we can say:

The important piece here is the a term, acceleration. If we solve the above equation for a, we can figure out the acceleration (or rather, deceleration) caused by friction on a moving object at any given time.
That g in this equation represents the acceleration due to gravity at the Earth's surface, typically represented as ~9.8 m/s². This piece comes from dividing the normal force, equivalent to mg, by m.
Now that we have acceleration, we can figure out the velocity, v, of the moving object using the following equation:

The same relationship holds for position, p, in relation to velocity:

Altogether, this means we can figure out where our moving object is in the current moment, how fast it's moving, and at what rate it's slowing down. This forms the basis of the physics simulation we use for friction, as well as the other forces that we model in renature. From a code perspective, this looks more or less like the following simplified example:
// Acceleration due to gravity at Earth's surface.
const g = 9.8;

// Calculate the force of friction.
const getFrictionForce = (mu: number, mass: number): number => {
  // The normal force is equal to the gravitational force in our simulation.
	const normal = g * mass;
	return -1 * mu * normal;
};

interface State {
	acceleration: number;
	velocity: number;
	position: number;
}

// Apply the force to determine the next velocity and position.
const applyForce = (
	state: State,
	mu: number,
	mass: number,
	time: number
): State => {
	const frictionForce = getFrictionForce(mu, mass);

	const acceleration = frictionForce / mass;
	const nextVelocity = state.velocity + acceleration * time;
	const nextPosition = state.position + nextVelocity * time;

	return {
		acceleration,
		velocity: nextVelocity,
		position: nextPosition
	}
};
Awesome! We've gone from having a physics equation for the force of friction, to building a model for applying that force over time, to having tangible code that expresses this model. In renature, our simulation is more precise than this, using two-dimensional vectors to model acceleration, velocity, and position. However, the core principles are the same.
We're one step closer to actually animating our DOM elements! We have nice pure functions we can use to run our simulation, but we aren't yet executing them in the browser. For that, we need requestAnimationFrame.
The Frame Loop
If you've done previous work with web animation in the past, or if you've worked to develop games or played around with a language like Processing, you may be familiar with the concept of a "draw loop" or a "frame loop". Most modern computers refresh their displays 60 times each second (or more), which gives the illusion of visual continuity to the user. When we animate objects on the web, we tap into these 60 frames per second (fps) via requestAnimationFrame, which instructs the browser to run a callback function once per frame. It is within this "frame loop" that we actually run our physics simulation of friction and animate our UI element.
A simplified example using our applyForce function above may look like this:
interface FrictionParams {
	mu: number;
	mass: number;
	initialVelocity: number;
}

const animate = ({ mu, mass, initialVelocity }: FrictionParams) => {
	// Store some local animation state tracking a, v, and p.
	let state = {
		acceleration: 0,
		velocity: initialVelocity,
		position: 0
	};

	/**
	 * The callback to run on each frame.
	 * Notice that this callback, simulate, must also call requestAnimationFrame.
	 * This is required to animate another frame at next browser repaint.
	 */
	const simulate = (timestamp: DOMHighResTimeStamp) => {
		/**
		 * Update our moving object's acceleration, velocity, and position!
		 * In this example, we use 1/60s as the time parameter, since this code
		 * runs once for each frame, assuming a 60fps refresh rate.
		 */
		state = applyForce(state, mu, mass, 1 / 60);
		requestAnimationFrame(simulate);
	};

	// Start the animation!
	requestAnimationFrame(simulate);
};
In the example above, you'll notice that we run the applyForce function once per frame. Assuming a 60fps refresh rate, this means our physics simulation happens at discrete time intervals – once every 16.6ms. This is adequate, but to improve the precision of the simulation even more in renature, we run the applyForce function once for every millisecond in the frame. This results in an even better approximation of a moving object's position over time, because we are incorporating, or integrating, the latest physics state at more frequent time intervals. Other libraries like react-spring and popmotion use a similar technique, sometimes referred to as an "integrated simulation". For more fully-featured physics engines, this is critical to supporting proper collision detection and object reactivity.
Nice! To recap, we first figured out how to model the force of friction through code. Next, we used the requestAnimationFrame loop to actually run the simulation over time in the browser. The final step involves translating a physics value, in our case the position of the moving object, into a scaled CSS value. This process is called interpolation.
Interpolating a CSS Property
If we have a block moving on a rough surface, and we know that it starts at position 0m and ends at position 100m, what percentage of the total distance has it covered at 50m? Doing a little bit of math, we can arrive at an answer:
const start = 0;
const target = 100;
const current = 50;

const progress = (current - start) / target = 0.5 = 50%
Using this same idea, we can figure out how far we've progressed across any distance given the current position and the target, or ending, position, and it will always be a value between 0 and 1! This is a simplified example to highlight the concept of linear interpolation (commonly abbreviated to just "lerp" in the animation world). In renature, we use this process to smoothly interpolate from one CSS value to another CSS value over time. An example might make this a bit clearer.
Let's say you have a useFriction hook set up, like so:
const [props] = useFriction<HTMLDivElement>({
  from: {
    transform: 'rotate(0deg)',
  },
  to: {
    transform: 'rotate(180deg)',
  },
  config: {
    mu: 0.5,
    mass: 20,
    initialVelocity: 1.5,
  },
});
When this hook gets run, we start a physics simulation using the requestAnimationFrame loop. On every frame, we ask the question, Where is our moving object now? Remember, we have this information available already (see the state object in the requestAnimationFrame code sample above). That's our current position. How do we figure out our target, our ending, position? For that, we use a well-documented set of physics equations called the kinematic equations. We won't go too deep into these right now, but it is worth noting that, using the kinematic equations, we can determine how far the block will have traveled when it comes to rest (has reached a velocity of 0). This is our target position. Our starting position is always 0.
And just like that, we have everything we need for our lerp! For every frame that the browser renders, we can calculate what percentage "done" we are with our animation. All that's left is to interpolate the from and to properties of our animation. A diagram of the above hook running will help make this clear.
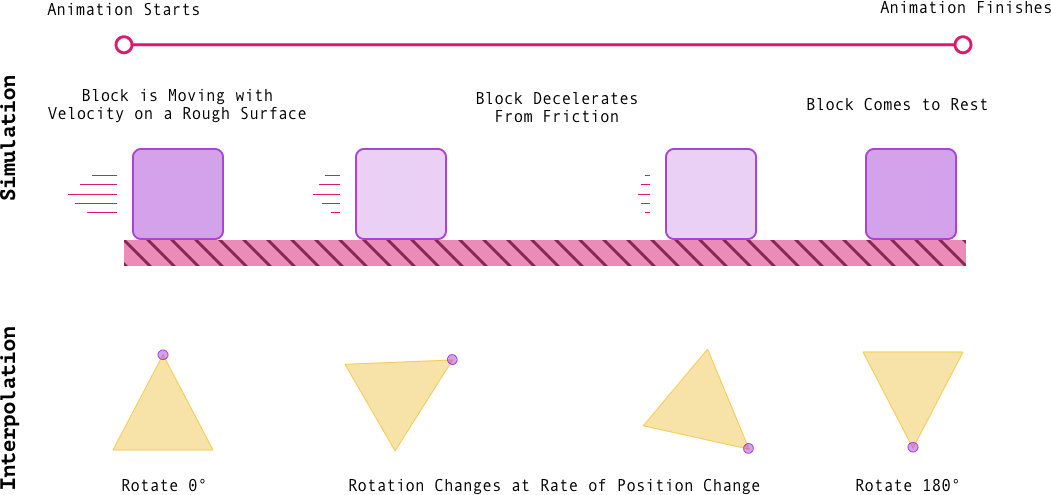
When our block has moved 30% of the total distance, we know that our animation should be 30% done. In this example we're rotating from 0° to 180°. What's 30% of 180? 54, right? So our triangle should be rotated 54°. Awesome!
This pattern of Simulate → Interpolate → Animate is at the core of how renature works. Friction, fluid resistance, gravity – it all works off this same notion of a starting and ending position that we interpolate between to figure out what the current style of your animating element should be.
Caveats, Drawbacks, and Improvements
We're really excited about the progress we've made on renature, and we're even more excited to continue to improve the backing physics implementations that power it. One of the exciting ideas we're playing with is using the kinematic equations directly to support traditional from / to style animations rather than a vector-based modeling system. With the kinematic equations you can derive a moving object's position as a function of time precisely, obviating the need to mimic continuous force application in the frame loop. However, the kinematic equations only work for objects moving with constant acceleration. This is fine for friction, but more problematic for gravity and fluid resistance.
We're also exploring two dimensional versions of our hooks for a Processing / p5.js-like experience. useGravity2D will ship with v0.1.0 and allows you to create beautiful simulations of two dimensional gravitational motion with ease. We may even expose a useOrbit hook in the near future, in addition to a hook for simulating the Two-body Problem. The goal with these hooks is to expand beyond simple from / to style animations to infinite, realistic physics simulations in the browser — a small physics engine of sorts! useFriction2D and useFluidResistance2D are also on our roadmap for the near future.
Finally, we want to continue to expand and improve our interpolator API. Currently, renature can interpolate numbers, unit CSS values (i.e. 20px, 0deg), colors (hex, rgb, rgba, hsl, and standard CSS colors), and even complex transforms! This is great, because users don't need to think too much about how they specify values — if you can write CSS, you can use renature! However, we do want to give users more control over the specifics of how values are interpolated, in addition to providing raw position and velocity values that they can modify and scale as needed. If you'd like to be involved in these efforts, star and watch the repo on GitHub — we'll be posting RFCs for contribution opportunities soon!
Go Forth and Animate!
I hope this post has given you a basic understanding of some of the fundamentals we're using to make renature work. Special thanks to my colleague, Mariano Martinez III, for being a terrific editor, as always, on this piece. To keep up to date on renature's process and follow the v0.1.0 release, follow me, @parker_ziegler, on Twitter, as well as the @FormidableLabs official Twitter. We can't wait to see what you build with renature.